Dinner Recipes, Easter, gluten free, Holiday, Recipes

Today’s New to Me 2021 Recipe: Filet of Beef

New year, new recipes! That was my motto for the start of this new year! Cooking dinner 6-7 nights per week is getting old. I miss the pre-Covid days when my husband and I would have date nights, nights out with friends, or Sunday family dinner at my parents’ house. When the late fall and winter months started, and we stopped eating out, I felt like I was making the same recipes every week- they were good recipes, but I was looking for new ones to make cooking dinner an exciting event again. I am off to a good start and thought I should share these new recipes that I am definitely saving for my recipe rotation ! They were all a success and easy to make. Most of the recipes were found online, from some of my favorite and famous chefs, thank you for always sharing and motivating us to try new recipes!

The recipes I will be sharing over the next seven blog posts include Filet of Beef (which my husband made for us!), Warm Lobster Salad Rolls (my husband made these too!), Rigatoni Bolognese, Sheet Pan Vinegar Chicken and new side recipes including Internet Famous Crispy Potatoes, Simple Green Beans and Roasted Artichoke Hearts.

Today’s New to Me 2021 Recipe: Filet of Beef

This recipe is compliments of Ina Garten on http://www.foodnetwork.com (Thank you!)

Ingredients: 1 whole filet of beef (4 to 5 pounds) trimmed and tied from butcher, 2 Tbsp unsalted butter at room temperature, 1 Tbsp kosher salt, 1 Tbsp ground black pepper

Directions (including extra tips that worked for us) :
1. Preheat oven to 500 degrees F.
2. Sprinkle a thick layer of kosher salt on the bottom of the pan (this tip helps reduce the roast from smoking in the oven).
3. Place beef on a rack in a roasting pan.
4. Spread butter all over the beef with hands.

5. Sprinkle with salt and pepper.
6. Roast in the oven for approximately 25 minutes for Medium-Rare. Tip: Make sure vent is on to help eliminate smoke from the high temperature oven and drippings.
7. Remove from the oven and cover the whole pan with foil and let sit at room temperature for 20 minutes.
8. Remove twine and cut into thick steaks.

About, Birthday Ideas, Easter, Holiday, Treats, Valentine's Day

2018 Holiday Gift Idea List for Women

2018 Holiday Gift Guide for Women 
It’s November, and if you have been to the mall or stores over the last week, you will have seen Christmas decorations and Holiday sales that have already started popping up. As much as I want to avoid it, planning ahead helps make my holidays less stressful. I usually keep a gift ideas list throughout the year, especially before Thanksgiving arrives.  If you are struggling for gift ideas this year for those special women (including tweens and teens too!) in your life, check out the list of ideas I have shared with you. I have included a variety of ideas at different price points. The ideas came from gifts I have given and/or received over the past year. All of the opinions are my own and I was not compensated for the items or to write this blog. Enjoy and Happy Shopping!
O
The Winter Street Series by Elin Hilderbrand
Uncommon Goods  Shades of Blue/Green Sea Glass Necklace
Bed of Roses Snoozies Slippers
I’ve Been Thinking by Maria Shriver
Red Envelope Inspire Cross Bracelet
Succulent Potted Plant
Stitch Fix Gift Certificate
L’Occitane Shea Butter Ultra Rich Body Cream
Gift Ideas for Tweens and Teens
Ivory Ella Tshirts and Hoodies
FujiFilm Instax Mini
Pura Vida Bracelets
Firefly Photo Clips
Bath Bombs
For other gift ideas, visit my blog posts from the past couple of years: A 2017 Holiday Gift Guide for Women and Holiday Gift Guide: For Women
Activities, Craft Box, Decorating, Desserts, Games and Activities, Holiday, Kids, Kids' Crafts, Made by Kids for Kids, Recipes, Treats

There’s Still Time to Make the Simplest Gingerbread Houses Before Christmas!

In our family, we cannot believe that Christmas is only 2 weeks! At dinner last night, we made a checklist of our remaining Christmas To-Do’s! My son’s first item was to make our annual Gingerbread Houses! This is one of my favorite Christmas memories with my children. It started back when my daughter was a Girl Scout in Kindergarten, 8 years ago! It is the simplest recipe out there! All you will need are milk or OJ cartons, store bought frosting, candy to decorate it (leftover Halloween candy works perfectly!), graham crackers, and a plastic knife to spread the frosting.

Click my blog link below for the simple step by step directions! Good luck and we hope this becomes one of your family’s Christmas traditions!

Made by Kids for Kids: Gingerbread Houses…the easy way!

Thank you to my daughter’s Girl Scout Troop Leader for sharing this adorable and easy recipe!

Activities, Decorating, Holiday, Kids, Organizing, Storage, Toys

Getting Organized Once The Holidays Are Over…

santa smidgen

New Year’s Day has come and gone. All of the confetti has been sweep away… time to tackle the after-holiday clutter. Here are a few simple tips to help you get you started:

  1. Create Holiday Storage Bins – As you remove your holiday decor, create and label plastic bins with similar decor items for a particular area in your home, an example “Christmas Decor – Mantle” or “Christmas Decor- Outdoor Lights”. For more tips, refer to a previous blog post Get Organized in 2015: Storage Solutions – Holiday Decorations
  2. Organize Gift Returns or Exchanges – Gather up any returns or exchanges that you may need to do, such as wrong clothes sizes, duplicates of toys, etc. For more tips, refer to a previous blog post Staying Organized in 2016 : Making Store Returns
  3. Write Thank You notes – Show your appreciation for the gifts you or your children received this holiday season, by writing thank you notes. For suggestions on thank you notes written by kids, refer to a previous blog post Thank You Notes Made by Kids
  4. Donate Clothes and Toys – If you or your children received new clothes and they have replaced PJ’s or sweaters that were too small, sort through  clothes and create a donation bag. The new toys they received may also replace some of their older toys, consider having your children sort through their toys, games and books to see if there are any that they would like to donate to their their children. For suggestions, on sorting through clothes and toys, refer to previous blog posts Should I Consign My Kids’ Clothes and Toys? , Get Organized in 2015: Toy Organization3-2-1 Quickly Clean Out Your Closet… This weekend
Appetizers, Dinner Recipes, Easter, Holiday, Inspired by Mom, Recipes, Snacks, Treats

Make Your Own Charcuterie

img_2319

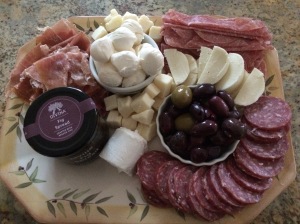
Charcuterie, or meat and cheese boards, are truly one of my favorite treats to myself when I eat out. I love being able to pick out what cheeses I want to sample, and meats to pick on, or olives from different countries to try. There is a local restaurant that I love  to visit that makes picking my charcuterie a joy! I recently made one for my husband’s’ birthday and thought I would share it on today’s blog as a suggested item for your upcoming holiday events … to serve or to bring.

How to Create a Charcuterie (“pronounced shahr- koo- tur-rtee“)

  • The meats and cheeses can be purchased at your local deli or supermarket. I found a variety in the deli case and others freshly sliced at the deli counter. In photo: Parma Prosciutto, Genoa Salami, Sopprassata, Sharp Provolone, Fresh Mozzarella (bocconcini), fresh goat cheese, fig spread, Gaeta olives, Spanish Olives, Kalamata Olives  (not shown here, a variety of 3 crackers).
  • Add a variety of soft and hard cheeses and mild and spicy meats.
  • Serve along side crispy Italian bread and olive oil or a variety of crackers or bread sticks.
  • Accent your cheese board with a variety of olives.
  • Serve on a large platter or an actual wooden board, cutting board or plank.
  • Makes for a great appetizer, luncheon platter, or open house style buffet.
  • Add a fig spread or red pepper jelly to compliment the soft spreadable cheeses.

img_2759

Activities, Birthday Ideas, Craft Box, Desserts, Games and Activities, Holiday, Kids, Kids' Crafts, Made by Kids for Kids, Recipes, Snacks, Treats, Valentine's Day

Gift Ideas: Sweet and Homemade by Kids

gift jar scrub

At Christmastime, there are always small, thoughtful gifts that my daughter has made for teachers, coaches, advisors, volunteers, family and friends. Today’s blog is a quick snapshot of some of the gifts and treats she has made over the last couple of  years. I hope one will inspire you (or your kids!) to try this year.

Note: Click on website for supplies needed and instructions for each gift idea.

Star Shaped Peppermint Bark

What you will need: Wilton Star Shaped Candy Mold, white (Vanilla) candy melts,candy canes (crushed), cellophane treat bags, labels and ribbon

Directions: Melt candy waters according to package. Pour into candy mold. Crush candy cane inside a Ziploc bag and sprinkle onto each star shape. Place in refrigerator until cooled and hardened. Pop out of mold and add to a treat bag. Add ribbon and label.

Cupcake in a Jar https://homesweetmamamia.wordpress.com/2016/04/13/cupcake-in-a-jar/

Christmas Pretzel Hugs  https://homesweetmamamia.wordpress.com/2016/02/11/sweet-and-salty-valentines-day-treats-repost/

Vanilla Brown Sugar Scrub https://homesweetmamamia.wordpress.com/2015/05/06/vanilla-brown-sugar-scrub-a-mothers-day-gift-for-someone-special/

Candy Cane Sugar Scrub  https://homesweetmamamia.wordpress.com/2015/12/17/diy-candy-cane-sugar-scrub/

Santa Kisses https://homesweetmamamia.wordpress.com/2016/11/28/gift-idea-santa-kisses/

Activities, Decorating, Games and Activities, Holiday, Kids, Toys, Treats

Start a New Christmas Tradition!

One of my favorite Christmas traditions that I have passed onto my children is The Advent Calendar. Some may call it a Christmas Calendar or a Countdown to Christmas … but whatever you refer to it as… it truly is a fun and joyful Christmas tradition in our home!

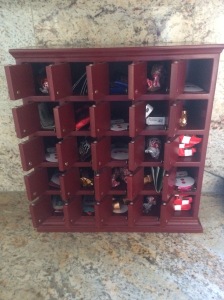
Here is my family’s Advent Calendar…

img_2189

My husband and I received Advent Calendar as a Christmas present 14 years ago from my husband’s sister and brother-in-law.

Here is what you do:

1. Find a calendar that fits your style or taste. Many stores and holiday shops have them. Our’s is from Restoration Hardware, which no longer seems to be available per their website. This Christmas, I have seen unique styles at Crate & Barrel, Home Goods, Hobby Lobby, Target and Party City. Make sure the openings are big enough to fit a small treat or prize inside.

2. Fill the calendar with surprises that are appropriate for your childrens’ ages. I fill our’s with their favorite individually wrapped chocolates and candies, dollar bills and coins, and special tokens. The past 2 years, as my children have gotten older, their “special tokens” have been tickets for extra tech time, later bed time, family movie night, pick a treat night, etc. A little extra something special for them to enjoy. Other suggestions for varying ages, plastic rings, bouncey balls, stickers, tattoos, mini-figures, cars, lip gloss, and other mini trinkets.

3. Put the calendar out on display and filled by December 1st! Now that they are older, we have each child take turns opening a door each day (when they were younger, there used to be a rush down to see who could open it first, that did not end well on some mornings!)

img_2187

Have a Happy Countdown to Christmas!

Easter, Holiday, Inspired by Mom, Recipes, Treats, Valentine's Day

Family Recipes: Inspired by Mom – Chocolate or Vanilla Cream Pie

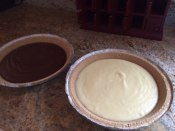
cream pies

Happy New Year! I hope everyone had a wonderful holiday and school (and, if you were lucky, work) break! The Christmas decorations are all put away! Everyone in my family is back to their normal routine, school and work, activities and homework. I want to thank everyone for continuing to follow me on my blog in 2015! I am almost approaching my 1 year anniversary for Home Sweet Mama Mia! In 2016, I will continue to share family recipes, simple recipes I find in books and online and use often, crafts and activities with my kids, some of my daughter’s baking and craft ideas and, of course, simple ways to get more organized in your busy life!

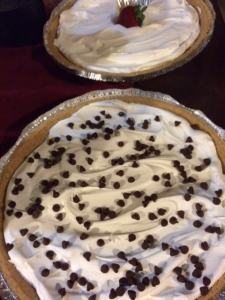
This week, I wanted to share a recipe I brought to our cousin’s house for a Christmas Day dessert. It is a recipe that I learned from my Mom many years ago. She made this recipe for many birthdays and special gatherings in our family. She actually found this recipe in the cookbook her old blender came with…a Waring brand blender she received as a wedding shower present almost 42 years ago! She does not have the Waring blender anymore, but she still makes this awesome recipe for Chocolate OR Vanilla Cream Pie. Over the years, we have both simplified the recipe by using store bought graham cracker pie crust and whipped cream topping (we all love short cuts!)…but we have never been able to replace the creaminess of the middle … the made-from-scratch pudding center! So here is a recipe passed on by my Mom, which I am sure both of my children will be saving… A true fan favorite!

Chocolate OR Vanilla Cream Pie Recipe  (Inspired by my Mom and her old Waring blender’s cookbook- that she still has!)

Ingredients: 2 tbsp flour, 2 tbsp corn starch, 1/2 tsp salt, 1/2 cup sugar, 3 egg yolks, 1 tsp vanilla, 1 tbsp butter (melted), 2 cups hot milk, 1/4 cup cocoa (Use ONLY for the Chocolate Cream Pie Recipe), a graham cracker pie crust*, and whipped cream* (*Use your own homemade crust and whipped topping recipes. I use Keebler’s Ready Crust Graham Pie Shell and Cool Whip.)

Directions:

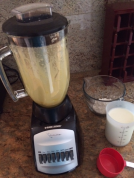
  1. Mix all ingredients except for the hot milk in a blender. (Add cocoa at this time if you want to make a Chocolate Cream Pie, for the Vanilla Cream Pie, omit this ingredient.)
  2. Pour hot milk into blender after about 15 seconds of blending other ingredients. Blend again.
  3. When all of the ingredients are blended together, pour into a saucepan on the stovetop. Stir on low heat for about 5 minutes or until thickened.
  4. Pour into crust and cover with plastic wrap.
  5. Let cool and refrigerate for about 2 hours.
  6. Top with whipped topping. Serve cold. Tip: Top with mini chocolate chips, fruit, or graham cracker or cookie crumbles.

cream pir blender       both cream pies    choc cream pie

Activities, Birthday Ideas, Games and Activities, Holiday, Kids, Kids' Crafts, Made by Kids for Kids, Recipes, Treats, Valentine's Day

Hot Cocoa Cupcakes : A Festive Cupcake Design

hot cocoa cupcake 1

This Hot Cocoa Cupcake design is so sweet and simple…yet looks like it was bought from a bakery!

My 11-year-old daughter baked these festive cupcakes for my husband’s birthday this week. She actually saw the cupcake design in a catalogue for Pier 1 Imports this holiday season. It was displayed on one of their festive dishes that was for sale and came up with the recipe by looking at the picture.  Follow these simple instructions below to create your own Hot Cocoa Cupcakes this Christmas or Winter Season.

Ingredients: plain chocolate cupcakes, white frosting (homemade buttercream frosting, store bought vanilla frosting or Cool Whip), mini marshmallows, mini candy canes, and milk chocolate chips, red cupcake liners.

hot cocoa cupcake 3

Directions:

  1. Bake chocolate cupcakes according to package instructions. Cool completely.
  2. Swirl frosting on top of cupcake to resemble whipped cream in a hot cocoa mug. She used homemade buttercream frosting (Recipe here: http://www.wilton.com/buttercream-icing/WLRECIP-41.html ) in a decorating bag with tip.
  3. Top each cupcake with mini marshmallows and milk chocolate chips. Crush candy canes and sprinkle on top of each cupcake.
  4. Gently place the mini candy cane on the edge of the cupcake to resemble a “mug” handle.

Baker’s Tip: For an easier recipe, use store bought vanilla frosting or Cool Whip and add it to a sealed sandwich bag. Cut the tip of one of the corners of the bag and swirl onto the cupcake.

hot cocoa cupcake 2

Have a sweet holiday! See you in the New Year!

Activities, Decorating, Dinner Recipes, Holiday, Kids, Organizing, Storage

Get Organized 2015 : Christmas Organization

gift boxes

Black Friday has come and gone. Cyber Monday seems like weeks ago. There is still time to get organized before Christmas arrives! Here are a few helpful tips to get you started:

  1. Create a gift list. Add names and gift ideas to this list for every person you will be buying a gift for this Christmas. Don’t forget to include family, friends, neighbors, teachers, coaches, instructors, service providers, etc. Keep this list with you at all times ( I keep it as a note on my phone), you never know when you will find that perfect something for someone on your list! Tip: Throughout the year, continue to keep a list of gift ideas for these people, so when next Christmas rolls around, you are already ahead of the shopping game, or use the idea for their birthday, etc.
  2. Develop a shopping map. Rushing out to buy presents without a list can become very disorganized and stressful… very quickly. Then, you find yourself turning into the Grinch! Once you develop your gift and idea list, develop a map of where to shop that makes sense and saves the most time. Consider a mall or department store that allows you to cross off many different people from your list.
  3. Consider shopping online. If you are someone that does not like to shop or does not have much free time (especially without kids in tow), consider shopping online. Most online retailers offer free shipping and now also offer gift receipts. A perfect way to check items off your list while your kids are sleeping, your sitting in your PJs, and you don’t have to deal with the crowds!
  4. Organize the gifts. Once your online shopping packages start arriving or once you return back from a big shopping day. Set aside an area in a closet or in your basement where you can store and organize all of the gifts you purchased. Consider creating a box or bin for each person, if you buy them multiple gifts, so you can remember what you already purchased or  keep a written list with these purchased items.
  5. Build a gift wrapping bin. Take inventory of what you will need to wrap all of your Christmas presents. Create a bin of tape, tissue paper, gift bags (various sizes), scissors, labels, markers,  ribbon,  and decorative boxes. Once you cross off a bunch of gift items from your  list, and are ready to start wrapping, pull out this box, turn on Christmas music  and start wrapping.
  6. Keep mailing addresses in an Excel file. If you send out Christmas cards, create an Excel spreadsheet of mailing addresses and update it throughout the year as family and friends move or get married, etc. Use this list to create mailing labels instead of writing out each address.
  7. Organize your Christmas décor. A must have organization tool for Christmastime are plenty of storage bins. This keeps all of your holiday décor in one place. My favorite storage bin is an ornament organizer. We have 3 large ones and it safely organizes all of our ornaments that we have collected over the last 39 years! Other organization tips : store and label Christmas lights together and pack your mantle décor in one bin. I posted a blog on Holiday Organization back in March 2015 https://homesweetmamamia.wordpress.com/2015/03/16/get-organized-in-2015-storage-solutions-holiday-decorations/ with some additional tips.
  8. Plan your Holiday Dinner. It is never too early to begin planning your holiday dinner. Check out my holiday dinner tips which I posted on my blog at Thanksgiving https://homesweetmamamia.wordpress.com/2015/11/17/get-organized-in-2015-hosting-a-holiday-dinner/ for organizing tips.
Desserts, Easter, Holiday, Inspired by Mom, Recipes, Snacks, Treats

Traditional Italian Recipes: Almond Biscotti

Almond Biscotti

Almond Biscotti Recipe

Check out my guest blog post which posted on December  22, 2014 on ModMommy.com during the 2014 Holiday Season. Click here to learn how to make Almond Biscotti, a Italian family recipe inspired by my Mom, and soon to be making its way to your own holiday cookie tray!

Click here for recipe:

http://www.modmommy.com/recipe-almond-biscotti-for-Christmas/

Birthday Ideas, Breakfast Recipes, Desserts, Easter, Holiday, Inspired by Mom, Recipes, Snacks, Treats, Valentine's Day

Traditional Italian Recipes: Nonna’s Panettone

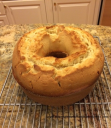
panettone

Panettone is an Italian sponge cake, usually served at Christmas time . Here’s my Nonna’s (Italian for “Grandmother”) version,  a sweet and simple cake to make for any occasion. Perfect with a cup of tea or coffee on a chilly Fall or Winter afternoon. Enjoy!

panettone slice

Ingredients: To make a large bundt or tube pan Panettone – 6 eggs, 1 1/2-2 cups of sugar (depending how sweet you want it to be), 1 1/3 cup vegetable oil,  1 1/3 cup milk, 5 tsp baking powder, 5 cups flour, 2 tsp vanilla

Directions:

  1. Preheat oven to 350 degrees F (325 degrees F for dark coated pans) and grease and flour bundt or tube pan.
  2. Combine eggs and sugar with mixer.
  3. Add milk and mix.
  4. Add oil and mix.
  5. Add vanilla and mix.
  6. Combine flour and baking powder. Gradually mix into batter.
  7. Bake for approximately 60-80 minutes, depending on oven and pan.

panettone in pan

Tips: Serve plain, or other options include sprinkled with powdered sugar, or serve along side cut fresh strawberries and a scoop of vanilla ice cream. This recipe can be cut in half and baked in a small round cake pan, which was the original recipe passed down by my Nonna, decrease cooking time to 15 minutes. My mom has also substituted orange juice for the milk in the recipe.

Birthday Ideas, Decorating, Holiday, Kids, Organizing

A Creative Way to Display Greeting Cards

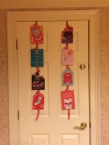
greeting card display birthday

About 8 years ago, I saw this display tip in a Real Simple Magazine and I have been using it ever since for every celebration!

What you will need: Ribbon, mini-clothes pins, & small nails or thumbtacks

Greeting Cards Display

Instructions: Locate a door that you would like to display your greeting cards. Cut ribbon to desired length.  Add small nails on top of the door and slip the ribbon onto it so it is secure (Tip: you can also press a thumbtack into the ribbon on top of the door). Hang greeting cards with mini-clothes pins to finish off display.

Tip: Use can use a variety of holiday themed or colored ribbons and mini- clothes pin designs for each celebration.